 LUMINESCENCE/PHOSPHORIMETRY
Last, but certainly not least, is the use of the MeasureNet “Colorimeter” as a “Phosphorimeter”… also called a “Luminometer”… which, is one of the more versatile Analytical “tools” not readily found in most laboratories. A “Phosphorecent” response can be induced by UV-fluorescence AFTER the light souce is removed… or it can be caused by a chemical reaction that causes the “emission” of VISIBLE Light photons. The proprietary design of the “Colorimeter” optical layout allows the analyst to get the desired response from their sample material… again using the same high-sensitivity optics.
Bio-Luminescence in Fish and Algae, Luciferin/Luciferase Reaction in Fireflies, UV-Blocking capacity of SPF Lotions, the ‘controllable' oxidation of Luminol Light-Sticks, the newly developed photo-luminescent additives for plastics used in skyscraper building and more are beginning labs you can use directly as-is, or modify for your own specific curriculum… as outlined for your review:
Luminescence (“Phosphorescence”) for Kinetic & Relative Comparison values:
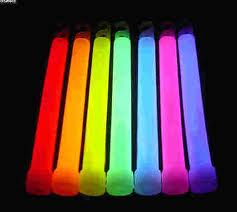
• Check out these Glow-in-the-Dark Plastics… some are made of material quite Fantastic!
• Bio-Luminescent Algae and Bacteria are found in “Healthy” Waters… See anything “Fishy”?
• P-AminoBenzoic Acid is the SPF of “Old”… using Luminscence its tale can be told!
• “UV” Light causes “Glow-in-the-Dark” Photon Motions… “Block” it with some SPF Lotion!
• “Luciferase” is the enzyme in the Fire-Fly… catch a few & give this Phosphorimetry Lab a try!
• The Luminol “Light Stick” reaction… uses Organic Oxidation to set those Photons in action!
Many current MeasureNet users that have the MDBC-138 “Colorimeter”… and potential customers, too… may not be aware of the tremendous versatility of this spectral device… and many potential *new* Customers in academia can save a significant amount of time, money and resources by implementing this technology for their teaching laboratories and educational curricula. Designed for simple, direct plug-n-play capability with any MeasureNet Workstation.
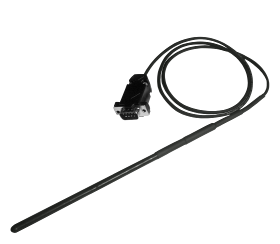
What makes the MeasureNet temperature probe unique? Two features in combination are what set this probe apart from other stainless-steel sheathed probes on the market; its rapid four-second response time and its acid resistant coating. These two characteristics are essential for conducting experiments like thermometric titrations and freezing point depressions in the general chemistry lab.
Before I go into the details of how we achieve these two essential characteristics, lets examine the most common temperature sensor options found in the chemistry lab. Listed in the table below are the three types most commonly used sensors and their properties:
| Attribute |
Thermocouple |
RTD |
Thermistor |
| Cost |
Low |
High |
Low |
| Temperature Range |
Very wide
-350oF
+3200oF |
Wide
-400oF
+1200oF |
Short to medium
-100oF
+500oF |
| Interchange ability |
Good |
Excellent |
Poor to fair |
| Long-term Stability |
Poor to fair |
Good |
Poor |
| Accuracy |
Medium |
High |
Medium |
| Repeatability |
Poor to fair |
Excellent |
Fair to good |
| Sensitivity (output) |
Low |
Medium |
Very high |
| Response |
Medium to fast |
Medium |
Medium to fast |
| Linearity |
Fair |
Good |
Poor |
| Self Heating |
No |
Very low to low |
High |
| Point (end) Sensitive |
Excellent |
Fair |
Good |
| Lead Effect |
High |
Medium |
Low |
| Size/Packaging |
Small to large |
Medium to small |
Small to medium |
(Table is courtesy of The Enginneering ToolBox)
One sensor not mentioned is the solid-state temperature sensor. We selected the LM35CH solid-state sensor for the MeasureNet temperature probe for three reasons; its response time, temperature range, and its easy interface to the measurement stations.
In designing the MeasureNet temperature probe, we focused on two characteristics; response time and acid resistance. The response time is particularly pertinent when selecting a temperature probe. When trying to measure a fast thermal reaction with a temperature probe that has a slow response time, as they say, garbage-in equals garbage-out! The other consideration is acid resistance, which impacts the probes durability.
This is where MeasureNet's acid resistant and thermally conductive coating comes in to play. It maintains its superior protective properties over long periods of time with minimal impact on its response time. It has passed extensive tests for protecting the probe in hydrochloric, phosphoric, sulfuric and nitric acid solutions. Most of the temperature probes on the market designed for rugged lab use embed the temperature sensor in a stainless-steel sheath. Although this gives the probe superior mechanical strength and some protection against weak acids, it slows the response time of the probe to 8-30 seconds depending on the sensor used and the design of the sheath. MeasureNet designed the temperature probe with the end user in mind, students in the chemistry lab.
Electronic Measurement and Data Collection in the Chemistry Laboratory
Hands-on Experiment - pH Titration Curve
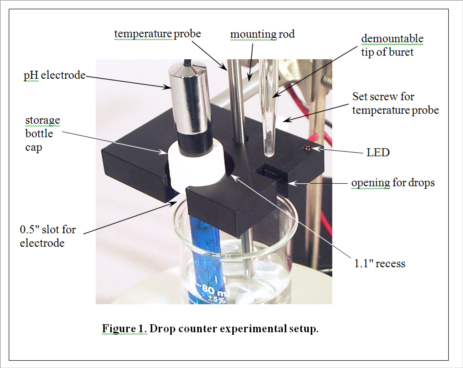
In this experiment, you will generate a titration curve for an unknown acid or base. Using a drop counter, you will add titrant and display a plot of pH vs. drops on the MeasureNet™ workstation.
Procedure
Calibrating the pH electrode
1. Move the black band on the pH electrode to uncover the hole in its side. Mount the electrode in a vertical position with a universal clamp on a ring stand (not the same one holding the burets), and connect it to the workstation. Place a waste beaker under the electrode and rinse the electrode with distilled water, then gently touch a Kimwipe to the electrode tip to remove the remaining drop of water. Pour a sample of a standard buffer solution into a disposable cup. Lower the pH electrode into the solution.
2. Press MAIN MENU on the workstation. A list of measurement types will appear on the screen. (Make a note of the station number listed at the top of the screen.) Press the function key listed for pH, then the function key for pH versus drops, and then press CALIBRATE. Follow the instructions on the screen, which will prompt you first to enter the temperature (if not known, just assume ~22°C), then to enter the known pH of the standard solution, and finally to monitor the pH displayed. Be sure to press Enter after the pH reading becomes steady. You are performing a single point calibration, so press F1 when prompted by the message on the workstation screen. Press DISPLAY and note the pH value on the workstation screen. If it is not within 0.02 pH units of the actual pH of the standard buffer solution, you should redo the calibration.
Titration Experiment
(Consult Figure 1 on the last page for a picture of the experimental setup.)
3. Select an unknown solution, which will contain either a mono- or diprotic weak acid, or a mono- or dibasic weak base. Pipet 25 mL of the unknown solution into a 50-mL beaker equipped with a stir bar. Place the beaker on the center of the stir plate. Place the pH electrode in the holder in the drop counter, and lower it into the beaker (near the wall of the beaker to avoid the stir bar) so that the protective shield rests lightly on the bottom of the beaker. Clamp the drop counter to a ring stand. Turn on the stir plate so that the stir bar is turning at the lowest sustainable speed. Note the initial pH of the solution. Based on this pH, decide which titrant (HCl or NaOH) you will use to titrate the solution. Fill a 50 mL buret with the appropriate titrant.
4. Position the buret containing the selected titrant so that its tip is over the appropriate opening in the drop counter, making sure that this is also over the beaker, probably near the wall opposite the pH electrode. It gets a little crowded here, and you will need to take care not to change the position of the beaker in the center of the stir plate. Don't let any titrant fall into the sample yet! When everything is arranged as in Figure 1 (except the temperature probe, which we aren’t using in this experiment), begin the titration by pressing START/STOP on the workstation. The station will first ask you to enter the starting reading on the buret. It need not be exactly 0.00 mL. Just read what it is and enter the appropriate value. The station display will now show the pH and the number of drops counted, 0 so far. Carefully turn the stopcock on the buret to begin adding the titrant. The red LED on the drop counter will flash each time a drop is counted. Try to maintain a rate of approximately 1 drop per second. A flow restrictor is used in the stopcock to make this easier to accomplish. Your only duty while the titration is running is to monitor the drip rate and make small adjustments of the stopcock if needed.
5. When you have followed the titration far enough, press START/STOP to stop the titration. The station will now ask you for the final volume reading on the buret. Read and enter the value.
6. Print your titration curve. Press FILE OPTIONS, read the menu that appears, and press the function key listed for PRINT DATA (standard). Enter the number of copies to be printed, and press ENTER. Your plots will appear on the printer attached to the PC. They will be labeled at the top with your station number.
7. Use the printed plot to estimate the pKa(s) for the substance you titrated, then ask the instructor to compare your results with what was expected for your unknown.

MeasureNet is pleased to announce that its blog will feature caricatures of notable chemists drawn by Professor William Jensen of the University of Cincinnati. The series will include a brief biographical summary of each individual authored by Jensen. The drawings will appear regularly on MeasureNet's its blog beginning in September, 2011.
I'm thrilled to have these Jensen works associated with MeasureNet. They'll add a very nice visual element to our media products. At the same time, they have a high degree of relevance to chemical education. Bill's drawings fit with our efforts to make the study of chemistry more interesting and germane to students of all academic backgrounds.
William B. Jensen, Ph.D. holds the Oesper Chair in the History of Chemistry and Chemical Education at the University of Cincinnati. He is also curator of the Oesper Collection of Rare Books and Portraits in the History of Chemistry and of the department of chemistry's apparatus museum. In the area of the history of chemistry, Dr. Jensen's interests center on the development of late 19th and early 20th century physical chemistry and inorganic chemistry, with special emphasis on the origins of chemical thermodynamics and solid-state inorganic chemistry. He also has made a detailed study of the origins and development of the 19th century scientific community in Cincinnati. Photos of his early 20th-century chemistry laboratory assembled at the University of Cincinnati have been used in MeasureNet brochures and exhibit displays.
 A Journal of Chemical Education article titled Managing Laboratory Data Using Cloud Computing as an Organizational Tool by Jacqueline Bennett and Harry E. Pence (J. Chem. Educ. June 2011:Vol. 88 no. 8) brings to light the the key role cloud computing will play in laboratory instruction.
The authors summarized the benefits of the cloud from a research and educational perspective nicely... "Cloud computing, where both software and computer files reside online, offers a solution to this data-management problem and allows researchers to coordinate their efforts just as easily whether they are working in the same laboratory or laboratories halfway around the world ".
MeasureNet Technology has been supplying chemistry lab instructors with cloud based tools for data-management, data security and Collaborative/Cooperative Learning solutions for many years. MeasureNet's Laboratory Electronic Measurement and Data Collection Technology is used in university chemistry labs by students to measure and collect data sets in the lab, store and share on the cloud and analyze these data sets from anywhere via the cloud. MeasureNet's patented unique Network design takes cloud computing to the next level by connecting students to the lab TA or instructor while they are are conducting the experiments. Using MeasureNet's real-time monitoring capablities, TA's in the lab can monitor student experiments to make sure they are conducting the experiments properly. Instructors or collaborators can also monitor the live data collection with their computers from any remote location via the internet.